...

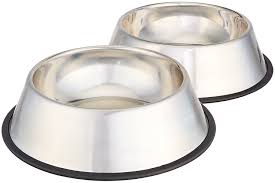
How To Clean Stainless Steel Dog Bowls

Dogs are not known for their hygiene, but without a doubt their health can be affected if we do not clean stainless steel dog bowls or toys regularly. In stainless steel dog bowls, the mixture of food and dog saliva can cause a gross film to stick to the bowls surfaces. Yuck. This leftover gunk can become rotten and rancid, and taint new food you put in the bowl.

Stainless steel bowls make the best dog dishes. They can easily be thrown in the dishwasher to properly clean and sanitize them. If you don’t have or want to use a dishwasher, you can soak the stainless steel dog bowls in warm water and dish soap.

How to Clean Stainless Steel Dog Dishes
How to Clean Stainless Steel Dog Bowls

Use a scrub brush or scrubbing sponge. Avoid using a harsh scrubber like an SOS pad because it will scratch the stainless steel. Doggo spit and food will stick even harder to a scratched up surface.

If you feed your dogs wet food, you may find soaking the stainless steel bowls is helpful. Soaking in warm water and dishsoap or a little vinegar can loosen the build-up in the bowls before scrubbing.

Always rinse bowls well with water after cleaning.

A good rule of thumb is to clean stainless steel dog bowls minimum once a week. Depending on the type of food you give your dog and how slobbery your dog is, you might have to clean stainless steel dog bowls every day or every other day.

Cleaning Algae from your fish tank

With a little work and a few simple cleaning supplies you can remove the unsightly algae from your fish tank.  Here are some of the supplies you will need:

Algae scraper/pad, Razor blade, Regular Household Bleach, Filter media, Water siphon, Lime remover or aquarium glass cleaner, Clean rags or towel, Paper towels

Start by cleaning the inside glass, then decorations, gravel, the exterior of the glass and cover and finally the filter.

Begin by giving the glass a thorough cleaning on the inside with an algae pad. There are a wide variety of algae scrapers on the market, from long handled scrubbers to magnetic scrubbers. Although they appear the same, houseware cleaning pads can have soap and chemical residue imbedded in the fibers. This reside can be lethal to your fish, so only use pads specifically intended for aquariums.

For stubborn residue on the glass, use a razor blade held at a very narrow angle to scrape it off. If your aquarium is acrylic, use a plastic razor blade, as steel razors will scratch acrylic even if you are very careful.

Once the inside glass is cleaned, remove rocks, artificial plants, or decorations that have significant algae growth, or are noticeably dirty. Do not clean them with soap or detergents as it is impossible to completely remove soap residue, and as mentioned even a trace can be lethal to fish. Typically a good scrub with an algae scraper will remove the algae and dirt from rocks and plants. For particularly stubborn cleaning problems, mix a 10% bleach solution and soak the items for 15 to 20 minutes. Scrub any remaining residue off, rinse thoroughly in running water, and allow to air dry, in the sun if possible.

Live plants can bleached, however stem plants are not tolerant of bleaching. To bleach live plants prepare a 5% bleach solution, soak the plants for two minutes, then rinse well. Leave the rocks, decorations and plants out of the tank while you vacuum the gravel. This way none of the debris stirred up from the gravel will settle back on the cleaned items.

Clean the gravel next, by using a water siphon to vacuum away the debris. There are several types of siphons available, all of which work essentially the same. Be sure to vacuum the entire surface of the gravel thoroughly so that all debris is removed.

Once the inside of the aquarium is cleaned, clean the hood, light, tank top, and outside glass. Regular glass cleaners contain ammonia, which is toxic to fish. Standard lime cleaners are even more toxic. I strongly urge using vinegar or cleaners designated as aquarium safe, and rinse rinse rinse!

After the outside is clean, the rocks, plants, and other decorations may be returned to the tank. Now wait a couple of weeks before cleaning the filter. Why wait? The major cleaning you just performed disturbed the beneficial bacterial colonies on the plants, rocks, and gravel. Fortunately many beneficial bacteria reside within the filter media, so you haven’t completely upset the Eco-system. However if you changed the filter at the same time, you might trigger a dangerous ammonia spike because there aren’t enough beneficial bacteria left to eliminate the toxins.

When you are ready to clean the filter, should you clean or simply replace the filter media entirely? Some experts caution that replacing the filter media removes too many of the beneficial bacteria, and triggers a new tank break-in cycle.  Some experts argue that sufficient bacteria reside on the rocks, plants, and in the gravel to prevent the tank from cycling when the filter is replaced.  What you should do depends on the type of filter media you use.

If you have filter media containing carbon, ammonia absorbers, or ion-exchange resins, it should be replaced if it’s more than three weeks old. After a couple of weeks the absorbing qualities of the media have been exhausted, and it no longer serves its purpose. Media that acts as a mechanical filter instead of absorbing toxins (i.e.: ceramic rings, filter fiber, or sponges) should be gently rinsed to remove debris and returned to the filter instead of replaced. If care is taken to use water that is the same temperature as the aquarium water, and the media is quickly returned to the filter, the bacterial colonies growing on them will not be lost entirely.

Don’t forget to clean the filter tubing and other parts of the filter assembly. A filter brush will help clear out the sludge that invariably builds up in all the small crevices.

Regular maintenance is the key to avoiding or significantly increasing the time between these major cleaning procedures.  Scrape the glass weekly, vacuum the gravel every time you perform a water change, and clean any rocks or plants as soon as you see debris or algae on them. Clean the filter monthly, either by replacing the media, or rinsing it. With regular care, your aquarium will look beautiful all the time.

For fish tank cleaning visit All Pond Solutions
5 quick tips for bad dog breath

P1000649They start out all cute and cuddly then as time goes on that cute little puppy starts to develop breath that could quite possibly be the worst thing you have ever smelled. Here are a few quick tips to help that nasty issue and allow you to remember the cute dog you used to have.

  1. Start brushing when your dog is a puppy some pet toothpaste comes in dog friendly flavors. It is not really much of a surprise that dogs breath smell, imagine not brushing your own teeth for several years
  2. If brushing is not an option, then buy a hard rubber toy with grooves. These chew toys are designed to help improve dental hygiene. Smear some yummy dog flavor toothpaste on the chew toy and you may even train your dog to brush his or her own teeth.
  3. Carrots make a great snack for dogs and they have a mild scrubbing affect on the teeth.
  4. Feed your dog good dry dog food which has more of an affect of scraping the teeth then wet or canned foods.
  5. A good rawhide chew also helps reduce the plaque build up.

How To Clean Dog Collars & Leashes

Someone sent in a question asking how to clean a dog collar.  I used to have to wash my dogs collars leashes more often when my dog was younger (she is 14 years old now and doesn’t run much these days ).  When she was younger we would go for a trail run a couple times a week and she would love getting all muddy.  I used to have a small mesh bag that I would place the leash in the bag and just launder with my regular laundry,  as long as it was a heavy load like towels.  that way the metal part of the leash would rub up against the washer drum. I would just hang the leather dog collars to dry.

It always worked for me, somes my dog would get into some pretyy stinky stuff out on the trails.  You got to love dogs!

Cat Grooming

General Info:
A clean, shiny coat is a sign of good health and nutrition, and by grooming your cat you can help encourage growth and shine. Cats are naturally clean animals so your cat may need little grooming.
Long haired cats need to be groomed regularly, as much as once a day. A good idea is to get the cat used to grooming when it is a kitten. If you can get your cat or kitten used to being groomed then regular grooming of the cat can be something you both enjoy. If the cat or kitten is nervous spend some time playing with it until it is comfortable with you touching it. Let it play with the comb or brush before attempting to groom it.

Technique:

  • Groom all the dead hair out of the coat using a comb or soft bristle brush. Be very gentle when combing the head.
  • Groom down the body, the tail, and the legs. Once groomed thoroughly go over the coat with the brush to remove all loose hairs.
  • With long haired cats and kittens the fur can become matted. The matted hair will need to be removed before attempting to groom. If the matting is severe it may be necessary to have your cat sedated and then clipped. Always seek expert advice if this problem occurs.
  • If the cat is dirty, a clean damp cloth may be used to wipe the cat down. Wet the cloth with warm water only. Bathing may be nessesary when there is a flea infestation.
  • When you are grooming your cat, you will have a good opportunity to check its skin for any lumps, rashes, discharges or other signs that your cat is not well. If you find any problems seek advice from your vet.

Cat Odors

General Info:

Have you ever had a guest visit your home and say, “Oh, you have a cat, don’t you?” If so, you may not be diligent enough in cleaning your cat’s box. If you clean the cat box with gusto, you might need some additional ammunition: a cat box deodorizer.

Technique:

    • There’s really no secret to how add-in cat box deodorizers work. They mask odor, absorb the ammonia that causes odor or do both. Some odor-control products make mighty promises that they don’t deliver on, so ask pet store staff for advice. Other than that, trial and error may be your best bet. An easy and economical solution may be as close as your refrigerator the open box of baking soda you might store in your fridge keep the contents smelling fresh. A box of baking soda can be placed in the area near your cat’s box (put it where your cats can’t knock it over), or sprinkle about a quarter cup into the litter and mix it in.
    • Add only the recommended amount of deodorizer to your cat’s litter, follow all label instructions and never apply any product directly onto your cat.
    • However, the best way to reduce cat box odor is to thoroughly wash your cat’s box on a regular basis, change the litter as your nose deems necessary and scoop out waste daily. With diligent cat box maintenance and a little help from a deodorizer, your guests will never know you’ve got a feline sharing your homeunless you want them to.

By Ellyce Rothrock

De-Skunk Solution For Your Dog

I got this recipe from a vet to get rid of skunk odor on our dog. It has worked well after he has rolled on dead fish and other unknown things. Mix 1 quart hydrogen peroxide, 1/4 cup baking soda, and 1 teaspoon liquid soap (any mild dish detergent). I use a rag and wipe it on. I don’t rinse it.

Dog’s Eyes

General Information:
Dog owners are very good at noticing signs of sickness since you spend so much time with your pets. You should look for inflamation, redness, discharge or scabs. Looking for the signs and catching an infection early is important.

Unless there is an problem, you should not need to clean your dog’s eyes regularly. When you give your dog its regular cleaning, you can put mineral oil in its eyes. This will protect the eyes from the debris or shampoo that might get into them. While it is not a cure for dry eye, it does lubricate the eye.

What is dry eye?

Dry eye is simply what it sounds. It is when your eyes become dry. While that may not sound like much, it can be incredibly painful. The medical term for it is keratoconjunctivitis sicca (KCS) and is caused by things like infection, tumors, immune reactions, trauma, or nerve degeneration. It can also be cause by chemicals that fall in the eye. This is why it is a good idea to put mineral oil in your dog’s eyes when you are bathing it.

How do you clean your dog’s eyes?

Before you do anything, you need to see your vet for medication. Usually dogs are given Optimmune and some type of antibiotic ointment. The first dosage will likely be given at the vet and will give you a lesson on how to do the same procedure at home.

The most common way to administer any ointment is to hug your dog under its chin. This should put you in a spot to be looking into its eyes. You might need to administer them on the side of the eye, so it will seep inward, in case your dog blinks.

With luck, the medication will kill the infection, and your dog will be back to normal. Sometimes, however, dry eye is chronic. While it might not be convenient, it is not fatal. Your vet will give you something to administer daily.
If you notice any signs of infection later, you will want to take your dog to the veterinarian immediately.

Cat vomit from fabric and furniture

How do I clean pet vomit from fine fabric and furniture?

Pets are great for companionship, but they aren’t so good about cleaning up after themselves….

The first thing to do is remove as much of the vomit as possible. A spatula and paper towels work great for the big chunky stuff, however it is the liquid portion that does most of the staining and smelling. The solutions for both surfaces are similar, however the furniture has the added dimension of cleaning the cushioning, or padding, which has soaked up this offensive liquid.

Depending on the type of fabric, there are different care guidelines. An excellent resource is www.fabriclink.com. The best general advice is to pick up an active enzyme (often marketed as enzyme based) detergent or additive. The enzymes will actually digest the proteins contained in the vomit. Allow the mixed enzyme to soak into the stain for at least one hour before laundering as normal following the regular care instructions for the fabric.

The furniture will require the same attention, however, since your sofa won’t fit in the washing machine, you will need to rent an upholstery extraction machine, which is just a carpet cleaner with an upholstery attachment. Once the surface residue has been removed, apply the enzyme mixture, and allow it to soak. The powerful suction from the extractor is needed to remove the vomit residue, the enzyme solution, and the rinse water from the padding. Using too much chemical, or leaving excessive rinse water in the area being cleaned, can result in mildew forming inside the cushion, so thorough extraction and proper drying is a must!

Good quality chemicals, specifically enzyme based detergents, can be found at commercial janitorial supply stores while an extractor can be rented at almost any large grocery store. Given the expense of renting the equipment, and the cost of chemicals, it is often a better value to hire a professional for the job. A reputable company will have much more powerful equipment, and so long as you alert them to the specific problem (vomit), they will be able to provide the proper chemicals for the job.

error

Enjoy this website? Please spread the word :)

Instagram
Follow by Email
RSS